Introduction
Transform humble Rice Krispies into an elegant springtime confection. This recipe elevates the classic treat, crafting delicate nests perfect for Easter celebrations or a sophisticated afternoon tea. We’ll explore techniques to achieve a refined texture and subtle flavor profile, far surpassing the ordinary.
Why This Works
This recipe’s genius lies in its simplicity and elegance. The familiar Rice Krispies provide a delightful crunch, while the addition of high-quality butter and a touch of vanilla extract transforms the humble cereal into a sophisticated dessert. The delicate nest shape adds a whimsical touch, perfect for showcasing the beautiful pastel hues of spring.
Key Ingredients
- 🥣 6 cups Rice Krispies cereal
- 🧈 1 cup unsalted butter
- 🍯 1/2 cup dark brown sugar, packed
- 🥚 1 large egg white
- 🥄 1 teaspoon pure vanilla extract
- 🍬 Assorted pastel-colored mini chocolate candies
Instructions
1️⃣ Melt the Butter and Sugar: In a large, heavy-bottomed saucepan over low heat, melt the unsalted butter and brown sugar together. Stir constantly until smooth and well combined. Avoid scorching.
2️⃣ Whisk in Egg White and Vanilla: Remove the saucepan from the heat and whisk in the egg white and vanilla extract until fully incorporated. The mixture will be slightly frothy.
3️⃣ Gently Fold in Rice Krispies: Add the Rice Krispies cereal to the wet ingredients. Gently fold with a spatula until the cereal is evenly coated. Be careful not to overmix, as this can result in a dense mixture.
4️⃣ Shape the Nests: Lightly grease a mini muffin tin or use paper liners. Using a spoon or a small cookie scoop, fill each cup about ¾ full with the Rice Krispie mixture. Gently press the mixture down to create a slight depression in the center of each nest.
5️⃣ Decorate and Chill: While the nests are still warm, immediately arrange pastel mini chocolate candies in the depression of each nest to create the effect of colorful eggs. Allow the nests to cool completely before serving. Refrigerate for at least 30 minutes before serving to allow the nests to fully set.
Handy Tips
- Use high-quality unsalted butter for the best flavor.
- For perfectly even nests, use a small cookie scoop for portioning the mixture.
- Let the mixture cool slightly before shaping the nests to prevent burning your hands.
Heat Control
Low and slow is key. Melting the butter and sugar over low heat prevents scorching and ensures a smooth, evenly cooked base for your nests. High heat will result in a burned and bitter taste.
Crunch Factor
The masterful crunch of the Rice Krispies is pivotal to this recipe’s success. Avoid over-mixing, which can result in a softer texture. The ideal balance is a crisp exterior with a slightly chewy interior.
Pro Kitchen Tricks
- For extra visual appeal, use a variety of pastel mini chocolate candies.
- Add a pinch of sea salt to the melted butter and sugar mixture for a sophisticated touch.
- Lightly spray your hands with cooking spray to prevent the mixture from sticking when shaping the nests.
Storage Tips
Store the Rice Krispie nests in an airtight container at room temperature for up to 3 days. For longer storage, refrigerate for up to a week.
Gift Packaging Ideas
Present your Rice Krispie nests in elegant mini cupcake boxes lined with pastel tissue paper. A small sprig of fresh rosemary or lavender adds a spring touch.
Flavor Variations
🌟 Citrus Burst: Add the zest of one orange or lemon to the melted butter and sugar mixture.
🌟 Salted Caramel: Drizzle a high-quality salted caramel sauce over the finished nests.
🌟 Coconut Crème: Incorporate 1/4 cup of toasted coconut flakes into the Rice Krispie mixture.
🌟 Espresso Delight: Add 1 teaspoon of instant espresso powder to the melted butter and sugar mixture for a sophisticated coffee flavor.
Troubleshooting
- Too sticky: If the mixture is too sticky, add a tablespoon or two of additional Rice Krispies cereal until it reaches the desired consistency.
- Too dry: If the mixture is too dry, add a teaspoon of melted butter at a time until it’s pliable.
- Uneven nests: Use a small ice cream scoop for consistently sized nests.
FAQ
- Can I use different types of cereal? While Rice Krispies are recommended for their iconic texture, small, crispy cereals such as corn flakes could be substituted.
- Can I make these ahead of time? Yes, these can be made up to 3 days ahead and stored in an airtight container at room temperature.
- How can I prevent the chocolate candies from melting? Refrigerate the nests for at least 30 minutes before serving. Choose high-quality mini chocolate candies that resist melting at room temperature.
Conclusion
These refined Rice Krispie Easter nests are a delightful treat to share with loved ones this spring. Their delicate crunch and charming presentation make them perfect for any occasion, elevating the simple pleasure of a classic into a truly memorable experience. We encourage you to share your creations and tag us in your photos! Enjoy!
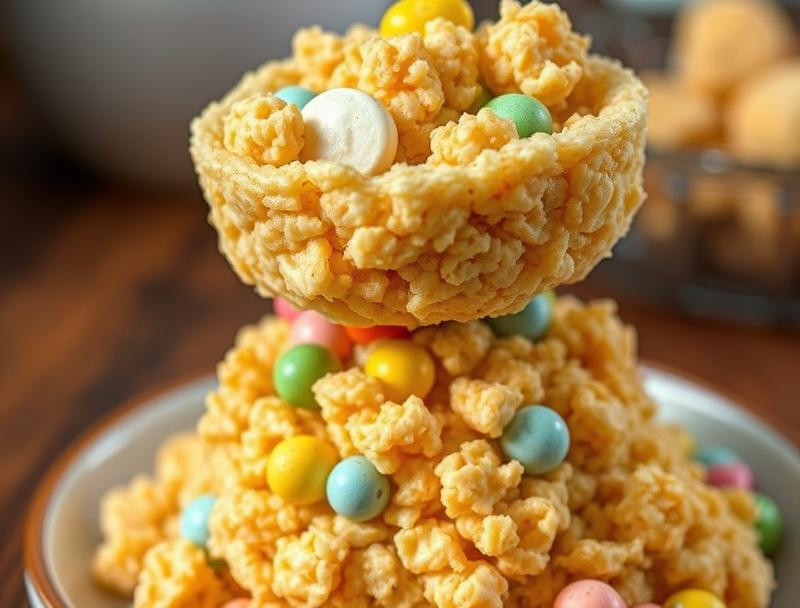
Delicate Easter Nests of Rice Krispie Delight
A fun and festive treat perfect for Easter, these delightful nests are made with Rice Krispies and decorated with colorful candies.
Ingredients
- 3 cups Rice Krispies cereal
- 1 cup mini marshmallows
- 3 tablespoons butter
- 1/2 teaspoon vanilla extract
- 1/4 cup chocolate chips
- 1/2 cup assorted candy eggs
Instructions
- In a large saucepan, melt the butter over low heat. Once melted, add the mini marshmallows and stir until completely melted and smooth.
- Remove from heat and add the vanilla extract, then stir in the Rice Krispies until well coated.
- Allow the mixture to cool for a few minutes, then lightly grease your hands and shape small clusters into nest shapes on a parchment-lined baking sheet.
- Melt the chocolate chips in a microwave or double boiler until smooth. Drizzle the melted chocolate over the nests.
- Before the chocolate sets, gently press the assorted candy eggs into the center of each nest.
- Let the nests cool completely at room temperature or in the refrigerator until the chocolate hardens.
Tips
- For extra flavor, consider adding a pinch of salt to the melted marshmallow mixture.
- You can customize the nests by using different types of candies or chocolates as decorations.