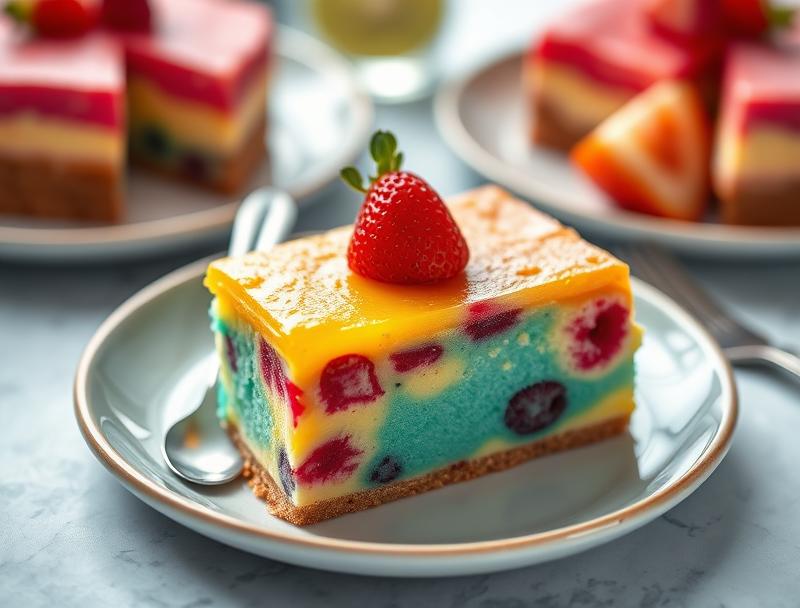
Colorful Summer Poke Cake for Parties
Introduction
Imagine a dessert so vibrant, it’s like a summer party on a plate. The Colorful Summer Poke Cake is a masterpiece of flavors and textures, perfect for any gathering. This cake is incredibly easy to make, using everyday ingredients that you might already have in your pantry. The best part? It’s highly customizable, allowing you to unleash your creativity and make it truly unique. With its moist cake base, refreshing fruity flavors, and pops of color from the poke filling, this dessert is sure to impress your guests and leave them wanting more.
Why This Works
- The balance of flavors in this cake is what makes it truly special. The sweetness of the cake and the filling is perfectly offset by the tanginess of the fruit, creating a delightful taste experience.
- Preparation is a breeze. The cake mix and the simplicity of the poke filling make this dessert accessible to bakers of all skill levels. You can have it ready in no time, perfect for last-minute party preparations.
- Despite its ease of preparation, the Colorful Summer Poke Cake presents impressively. The colorful pokes of filling through the white cake create a beautiful, eye-catching effect that’s sure to be the centerpiece of any dessert table.
Ingredients
- 1 package of white cake mix
- 1 cup of mixed fruit juice (such as pineapple, orange, and cranberry)
- 1 cup of plain yogurt
- 1/2 cup of granulated sugar
- 1/4 cup of honey
- Food coloring (red, yellow, blue, and green)
- 1 cup of whipped cream
- Fresh fruits (such as strawberries, blueberries, and raspberries) for garnish
Instructions
- Step 1: Begin by preheating your oven to 350°F (175°C). Prepare the cake mix according to the package instructions and pour it into a 9×13 inch baking dish. Bake until a toothpick inserted into the center comes out clean, then let the cake cool completely.
- Step 2: While the cake is cooling, prepare the poke filling. In a small bowl, mix together the fruit juice, yogurt, granulated sugar, and honey until well combined. Divide the mixture into four parts and add a few drops of different food coloring to each part to create red, yellow, blue, and green colors.
- Step 3: Once the cake is completely cool, use a skewer or fork to poke holes all over the top of the cake. Pour the colored fillings over the top of the cake, making sure each color goes into the holes evenly. You can use a spoon to gently guide the fillings into the holes for a more uniform look.
- Step 4: Refrigerate the cake for at least 2 hours to allow the fillings to set. Just before serving, top the cake with whipped cream and garnish with fresh fruits. You can arrange the fruits to match the colors of the filling for a cohesive look.
Handy Tips
- For a more intense flavor, you can use less yogurt and more fruit juice in the poke filling. However, be careful not to make it too runny, as it might not set properly in the fridge.
- Experiment with different combinations of fruit juices and colors to create unique flavor profiles and visual effects. For example, you could use a berry juice for a purple color or a mango juice for a vibrant orange.
- To ensure the cake absorbs the filling evenly, make sure the holes are not too deep and are spaced out consistently. This will also help prevent the cake from becoming too soggy.
Heat Control
Since this recipe involves baking a cake, it’s crucial to have good heat control. Ensure your oven is at the correct temperature (350°F or 175°C) before baking. The cake is done when a toothpick inserted into the center comes out clean. Avoid overbaking, as it can make the cake dry and less receptive to the poke filling.
Crunch Factor
This dessert is all about moistness and softness, thanks to the cake and the creamy filling. However, the freshness of the fruits on top adds a delightful texture contrast. For an extra crunch, you could sprinkle some toasted nuts or shredded coconut over the whipped cream before serving.
Pro Kitchen Tricks
- To make the cake more stable and easier to serve, you can freeze it for about 30 minutes before topping it with whipped cream and fruits. This will firm up the cake and prevent it from breaking apart.
- For a professional finish, pipe the whipped cream onto the cake instead of spreading it. This creates a clean, rounded look that’s perfect for special occasions.
- Consider using a cake stand or a pedestal to display your Colorful Summer Poke Cake. This will not only make it a focal point of your party but also make it easier for guests to serve themselves.
Storage Tips
- The cake can be stored in the refrigerator for up to 3 days. Make sure it’s covered with plastic wrap or aluminum foil to prevent drying out.
- It’s best to add the whipped cream and fresh fruits just before serving, as they can make the cake soggy if left on for too long.
- If you’re planning a party well in advance, you can bake the cake and prepare the poke filling ahead of time. Store them separately in the fridge until you’re ready to assemble the dessert.
Gift Packaging Ideas
If you’re considering gifting this cake, presentation is key. Place the cake in a large, decorative tin or a cake box. You can wrap a ribbon around the box and attach a gift card or a handwritten note. For a more rustic look, consider placing slices of the cake in mason jars, topping them with whipped cream and fruits, and sealing the jars with a ribbon and a gift tag.
Flavor Variations
- Try using different types of milk or yogurt for the poke filling, such as coconut milk or almond yogurt, for a unique twist on the flavor.
- Attempt to make a boozy version by adding a small amount of liquor (like rum or Grand Marnier) to the filling for a grown-up twist.
- Swap out the granulated sugar for honey or maple syrup in the filling for a slightly different sweetness profile.
Troubleshooting
- If your cake turns out too dry, it might be due to overbaking. Try reducing the baking time or checking the cake more frequently towards the end of the baking time.
- If the poke filling doesn’t set, it could be because the cake wasn’t completely cool, or the filling was too runny. Make sure to chill the cake and adjust the filling consistency by adding more yogurt or honey.
- For a cake that’s too soggy, you might have added too much filling or not refrigerated it long enough. Try to balance the amount of filling and ensure the cake has enough time to chill before serving.
FAQs
- Can I freeze the cake? Yes, you can freeze the baked cake for up to 2 months. However, it’s best to add the poke filling and toppings after thawing for the best results.
- Is the cake gluten-free? Depending on the cake mix you use, it might be gluten-free. Always check the ingredients of the mix to ensure it meets your dietary requirements.
- Can I double the recipe? Absolutely! Just keep in mind that you’ll need a larger baking dish and possibly more filling and toppings. Adjust the baking time accordingly, as a larger cake will take longer to cook through.
Conclusion
The Colorful Summer Poke Cake is a versatile, fun, and delicious dessert perfect for any summer gathering. With its ease of preparation, vibrant colors, and customizable flavors, it’s sure to be a hit with both kids and adults. Don’t be afraid to experiment with different ingredients and presentation ideas to make it your own. Whether you’re a seasoned baker or a beginner, this cake is a great way to bring some joy and color to your next party. So go ahead, get creative, and make this summer one to remember, one delicious poke cake at a time!
Colorful Summer Poke Cake for Parties
A moist and flavorful cake filled with colorful fruit juices, perfect for summer parties and gatherings.
🥘 Ingredients
👩🍳 Instructions
-
1Preheat the oven to 350°F and prepare the cake mix.
-
2Bake the cake and let it cool completely.
-
3Prepare the poke filling by mixing fruit juice, yogurt, sugar, and honey.
-
4Poke holes in the cooled cake and fill with the colored fillings.
-
5Refrigerate the cake for at least 2 hours before topping with whipped cream and fresh fruits.