Strawberry Cheesecake Dessert Tacos – Crispy, Creamy & Totally Irresistible! 🍓🌮
Introduction
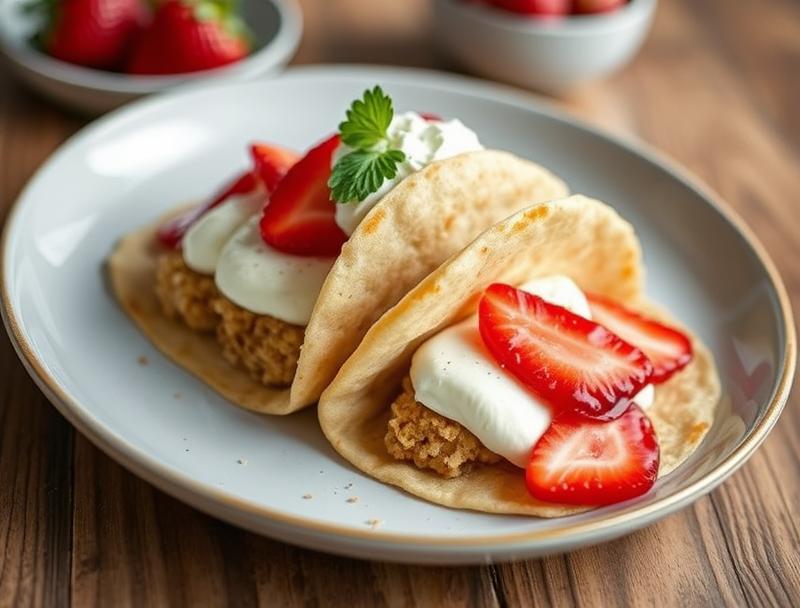
Imagine a dessert that combines the crispy shell of a taco with the creamy richness of cheesecake and the sweet freshness of strawberries. This innovative dessert, Strawberry Cheesecake Dessert Tacos, is not only a treat for the taste buds but also a visually appealing dish that is sure to impress your friends and family. The best part? It’s made with everyday ingredients and is surprisingly easy to prepare. In this recipe, we’ll guide you through the simple steps to create this masterpiece, highlighting the ease, flavor, and creativity that makes it truly special.
Why This Works
- Flavor balance and ingredient accessibility: The combination of strawberries, cheesecake filling, and crispy taco shells creates a perfect balance of flavors and textures that is both familiar and exciting. All the ingredients are easily accessible in most supermarkets, making this dish highly approachable.
- Ease of preparation: Despite its impressive presentation, this dessert is relatively simple to prepare. It requires minimal cooking and can be assembled in no time, making it perfect for both beginners and experienced cooks.
- Impressive results with minimal effort: The beauty of this dessert lies in its ability to wow your guests with minimal effort. The combination of store-bought taco shells and a simple cheesecake filling means you can achieve professional-looking results without spending hours in the kitchen.
Ingredients
- 1 package of taco shells (about 12 shells)
- 16 ounces cream cheese, softened
- 1/2 cup granulated sugar
- 1/2 cup sour cream
- 1 teaspoon vanilla extract
- 1 cup sliced strawberries
- 1 cup whipped cream
- Chopped fresh mint leaves for garnish
- Confectioners’ sugar for dusting
Instructions
- Step 1: Begin by preparing your cheesecake filling. In a large mixing bowl, beat the softened cream cheese until it’s smooth. Add the granulated sugar, sour cream, and vanilla extract, and mix until well combined.
- Step 2: Wash and slice the strawberries. You can also prepare your whipped cream by whipping heavy cream until it forms stiff peaks. Set both aside.
- Step 3: To assemble the dessert tacos, fill each taco shell with a generous amount of the cheesecake filling. Top the filling with sliced strawberries and a dollop of whipped cream.
- Step 4: For the final touches, garnish each taco with a sprinkle of confectioners’ sugar and a few leaves of fresh mint. Serve immediately and enjoy!
Handy Tips
- For an extra crispy taco shell, bake them in the oven at 350°F for about 5 minutes. Keep an eye on them to prevent burning.
- If you’re not a fan of strawberries, feel free to substitute with other fruits like blueberries, raspberries, or bananas.
- To make the dessert more stable, you can insert a popsicle stick or a small wooden skewer into each taco shell before filling.
Heat Control
This recipe involves minimal heat, primarily for toasting the taco shells if desired. The ideal temperature for toasting taco shells is 350°F, and the timing should be around 5 minutes. Keep an eye on the shells to ensure they don’t become too brown or burnt.
Crunch Factor
The crunch in this dessert comes from the crispy taco shells. To achieve the perfect crunch, ensure that your taco shells are fresh and that you toast them correctly if you choose to do so. Over-toasting can make the shells too brittle and prone to breaking.
Pro Kitchen Tricks
- Use high-quality ingredients: The taste and texture of your dessert tacos heavily depend on the quality of your ingredients. Choose fresh strawberries and real whipped cream for the best results.
- Assemble just before serving: To keep the taco shells crispy and the whipped cream from melting, assemble the dessert tacos just before serving.
- Customize with toppings: Offer additional toppings like chocolate shavings, chopped nuts, or caramel sauce to let everyone customize their dessert tacos to their liking.
Storage Tips
- Store the cheesecake filling and whipped cream in separate airtight containers in the refrigerator for up to 24 hours.
- Keep the taco shells in their original packaging to maintain crispiness. If you’ve toasted them, store them in an airtight container for up to a day.
- Assembled dessert tacos are best consumed immediately but can be stored in the refrigerator for a few hours. Allow them to come to room temperature before serving for the best texture.
Gift Packaging Ideas
If you’re planning to give these dessert tacos as a gift, consider packaging them in a cute, sturdy box lined with parchment paper. You can place each taco in a small paper cupcake liner for added protection and visual appeal. Top the box with a clear plastic lid or wrap it in cellophane and tie with a ribbon. Include a few extra toppings on the side for a personalized touch.
Flavor Variations
- Different fruits: Experiment with various fruits like peaches, kiwis, or mangoes to create unique flavor combinations.
- Creative toppings: Offer a variety of toppings such as caramel sauce, hot fudge, chopped nuts, or sprinkles to cater to different tastes.
- Ingredient swaps: For a lighter version, you can use Greek yogurt instead of sour cream or opt for a sugar-free sweetener.
Troubleshooting
- Texture problems: If your cheesecake filling is too runny, refrigerate it for about 30 minutes to firm up. If your whipped cream is too stiff, you can soften it by leaving it at room temperature for a few minutes.
- Ingredient replacements: If you don’t have sour cream, you can substitute it with a mixture of milk and lemon juice or vinegar. For vanilla extract, you can use almond extract as a substitute.
- Over/undercooking signs: Since this dessert involves minimal cooking, the primary concern is the toasting of the taco shells. Keep an eye on them to prevent over-toasting, which can make them too dark and bitter.
FAQs
- Can I freeze it? While you can freeze the cheesecake filling and whipped cream separately, it’s not recommended to freeze assembled dessert tacos due to the texture changes in the taco shells and whipped cream.
- Is it gluten-free? This recipe can be gluten-free depending on the type of taco shells you use. Ensure you choose gluten-free taco shells to accommodate dietary restrictions.
- Can I double the recipe? Yes, you can easily double or triple this recipe for larger gatherings. Just remember to adjust the ingredient quantities accordingly and assemble the dessert tacos just before serving to maintain freshness and texture.
Conclusion
Strawberry Cheesecake Dessert Tacos are a game-changer for anyone looking to impress their guests with a unique, easy-to-make dessert. With its perfect balance of crispy, creamy, and sweet, this dish is sure to become a favorite. Feel free to experiment with different fruits and toppings to make it your own, and don’t hesitate to reach out if you have any questions or need further substitutions or variations. Happy cooking, and we hope you enjoy every bite of these irresistible dessert tacos!
Strawberry Cheesecake Dessert Tacos – Crispy, Creamy & Totally Irresistible! 🍓🌮
A unique dessert combining crispy taco shells with creamy cheesecake filling and fresh strawberries, perfect for special occasions or as a creative twist on traditional desserts.
🥘 Ingredients
👩🍳 Instructions
-
1Prepare the cheesecake filling by beating the cream cheese, granulated sugar, sour cream, and vanilla extract until smooth.
-
2Wash and slice the strawberries, and prepare the whipped cream.
-
3Assemble the dessert tacos by filling each taco shell with cheesecake filling, topping with sliced strawberries and whipped cream.
-
4Garnish with confectioners' sugar and fresh mint leaves, and serve immediately.